Microsoft Paint (commonly known as Paint) is a simple graphics application available on the Windows operating system, but surely many users still do not know all the features and how to use the tools that Paint provides. If you want to learn more about Paint so that you can use Paint when needed, please refer to the article below.
Here is a guide on how to use Paint in Windows in the most complete and detailed way, from how to open Paint, use Paint to edit photos, use Paint to draw to how to save images in Paint, keyboard shortcuts in Paint. . We invite you to take a look at the article.
Open Paint in Windows
Click on the Cortarna icon or search box, enter the keyword Paint in the search box and select the Paint application.
So you have opened Paint on Windows.
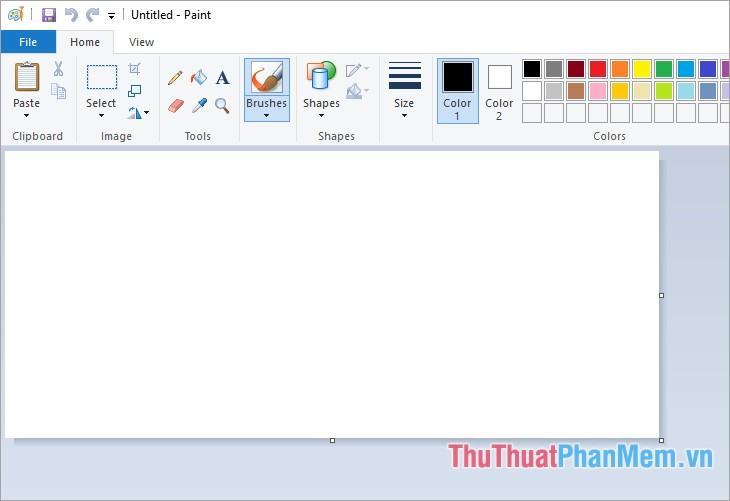
Use Paint to edit photos
1. Open the image file to be edited
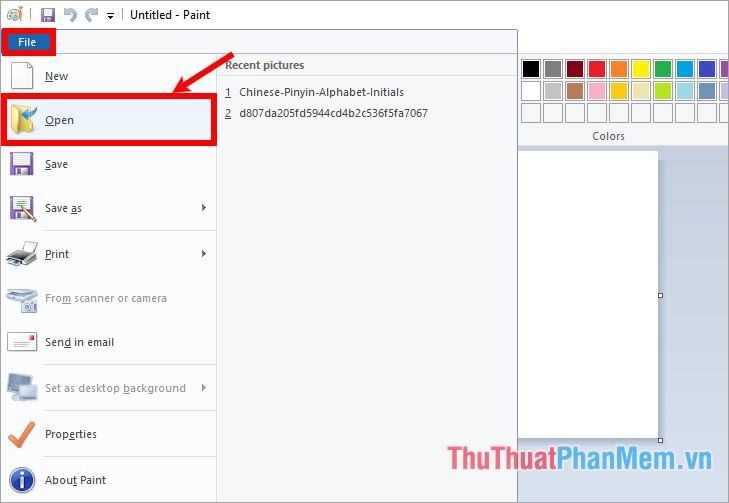
On the Paint interface, select File -> Open.
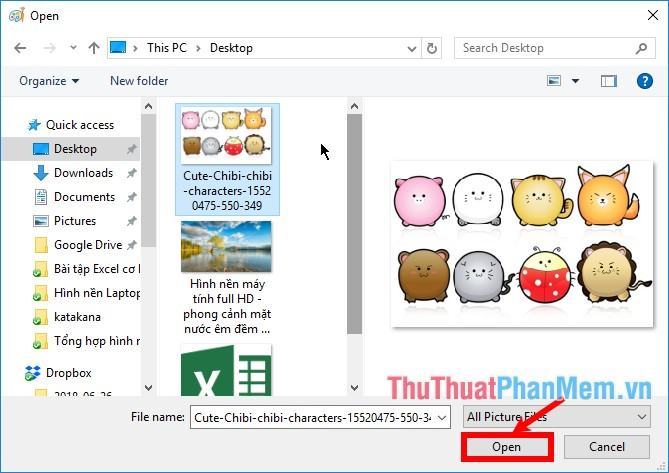
Then navigate to the image file to edit and click Open.
2. Display mode, zoom in, zoom out
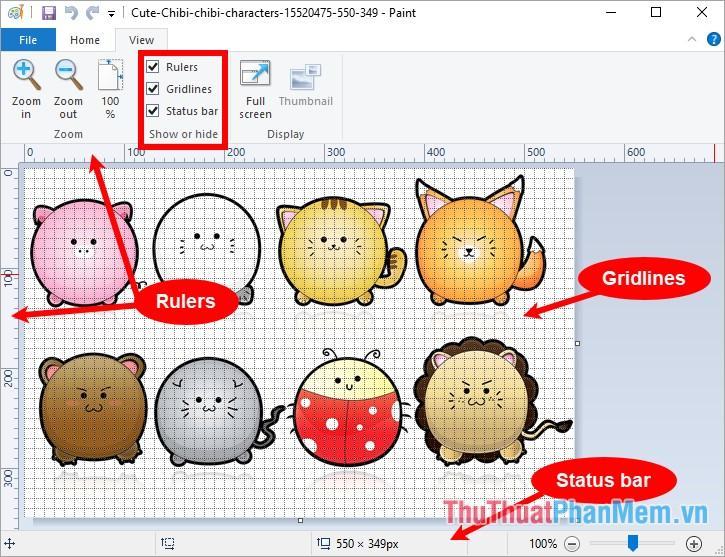
On the Paint interface, select the View tab, in the Zoom section you can enlarge the image by clicking Zoom in, click Zoom out if you want to shrink the image, select 100% if you want to keep the size. image.
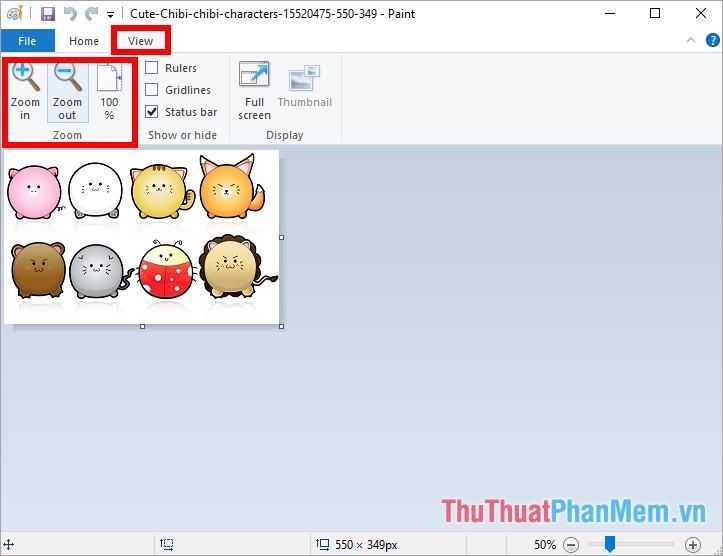
In the Show or hide section, you can hide/show the horizontal ruler, the vertical ruler (Rulers), the grid lines in the image (Gridlines), the bottom status bar (Status bar). If you want to show a part, you tick the box before the name of that part, if you want to hide it, just uncheck the box in the box.
3. Crop Photos in Paint
Select the Home tab, select Select, then hold down the mouse button to drag the area of the image to be cropped and select Crop (or Ctrl + Shift + X) to crop.
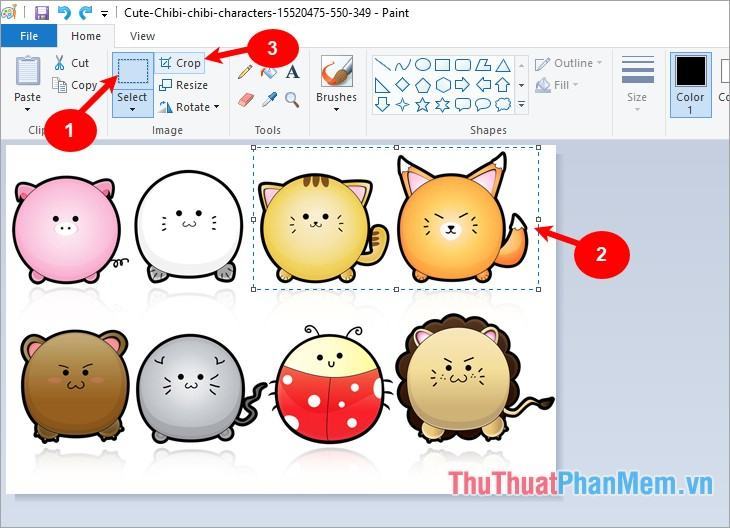
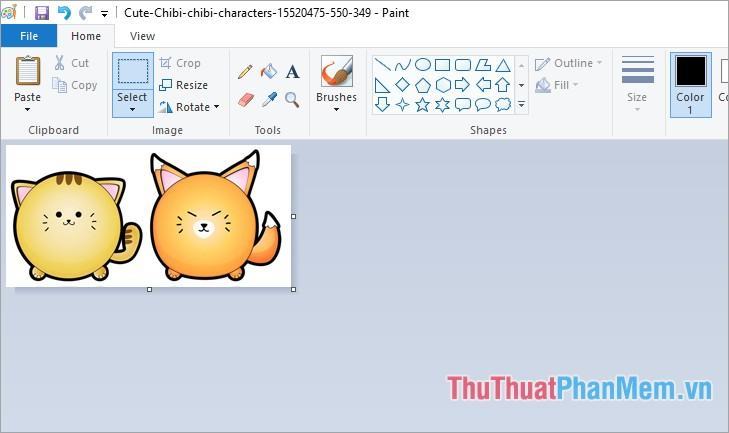
So your image will be cropped according to the area of the image you just selected.
For details on how to crop images in Paint, you can refer to the article https://thuthuatphanmem.vn/huong-dan-cach-cat-anh-bang-paint/
4. Select image area in Paint
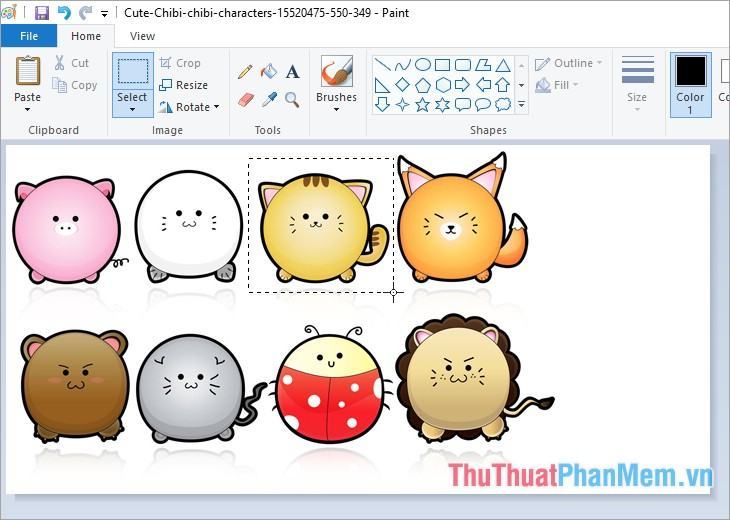
In the Image section of the Home tab, click on the word Select, here you have two ways to select the image area:
- Rectangular selection: select by rectangular selection
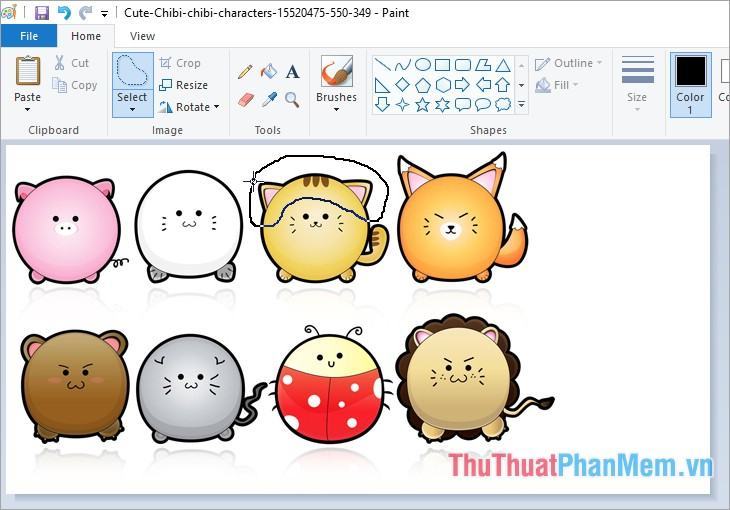
- Free-form selection: select in free form.
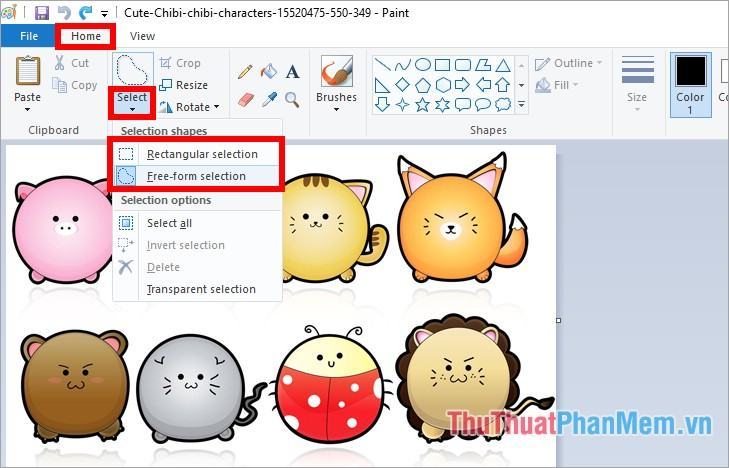
If you choose Rectangular selection, you just need to hold down the mouse from the starting point and drag it to the desired position.
If you choose Free-form selection, hold down from the starting point and draw the selection as desired.
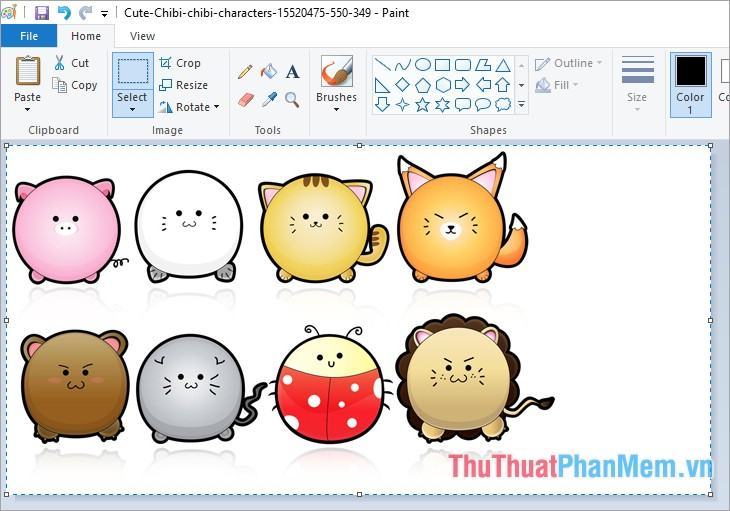
If you want to select all images, you can choose Home -> Select -> Select All (or Ctrl + A).
5. Copy and move selection
After you have selected the image area, you can copy the selection by choosing Home -> Copy (Combination Ctrl + C), if you move, you choose Home -> Cut (Combination Ctrl + X).
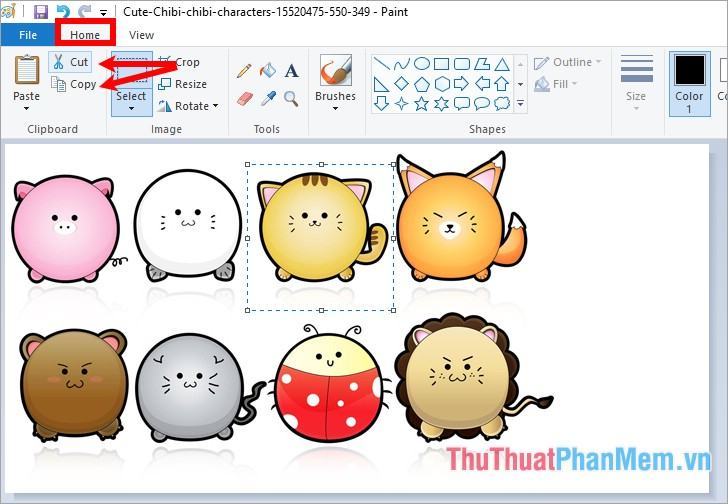
Then choose Home -> Paste (Ctrl + V) to copy or move.
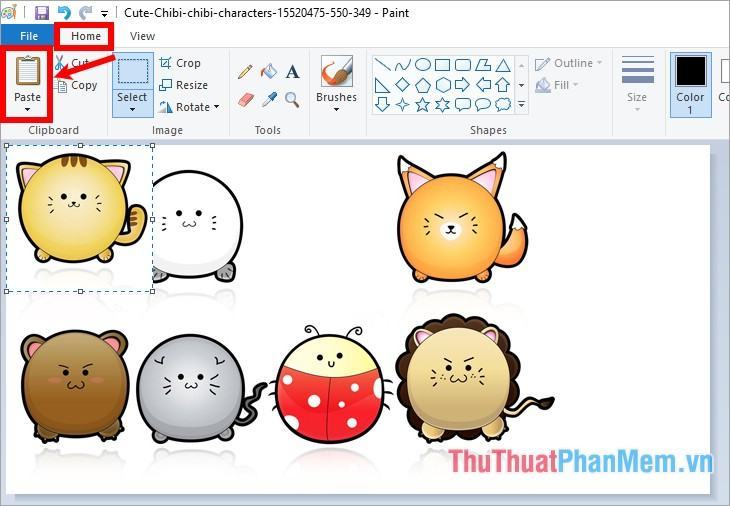
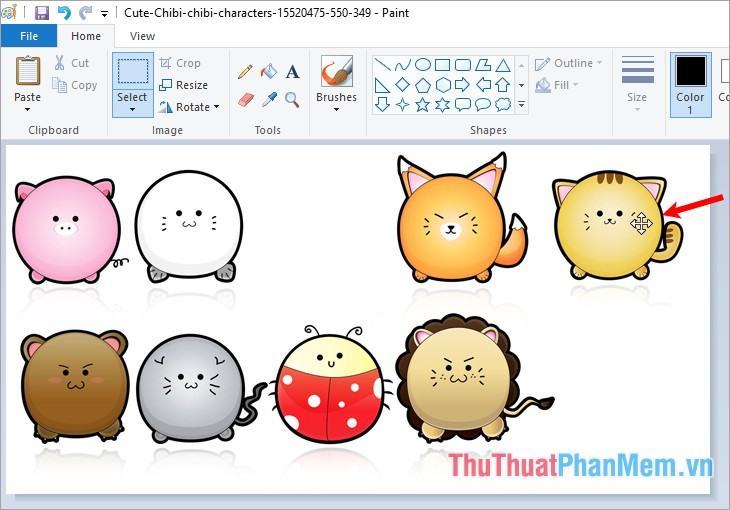
The area of the image that has just been copied and moved is displayed at the first position of the image, you hold down and drag it to the position you want.
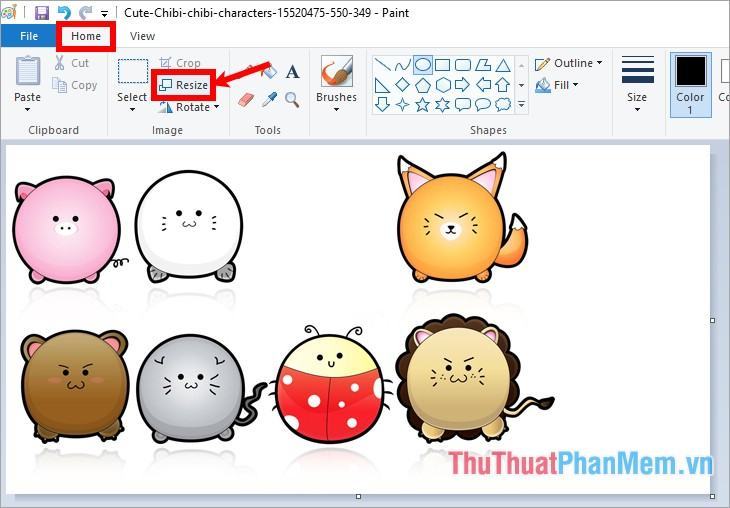
6. Resize Photos in Paint
In the Home tab, select Resize.
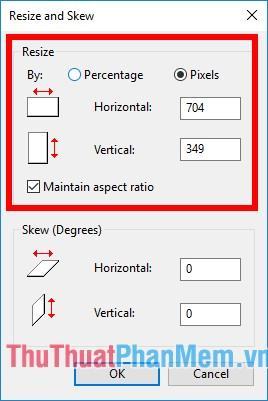
The Resize and Skew dialog box appears, in the Resize section you can choose to resize the image by percentage of the size (Percentage) or by size (Pixels). Then you enter the new size for the image in two boxes Horizontal (horizontal image), Vertical (vertical image) and click OK.
For details on how to resize images in Paint, you can refer to the tutorial https://thuthuatphanmem.vn/huong-dan-thay-doi-kich-thuoc-resize-anh-bang-paint/
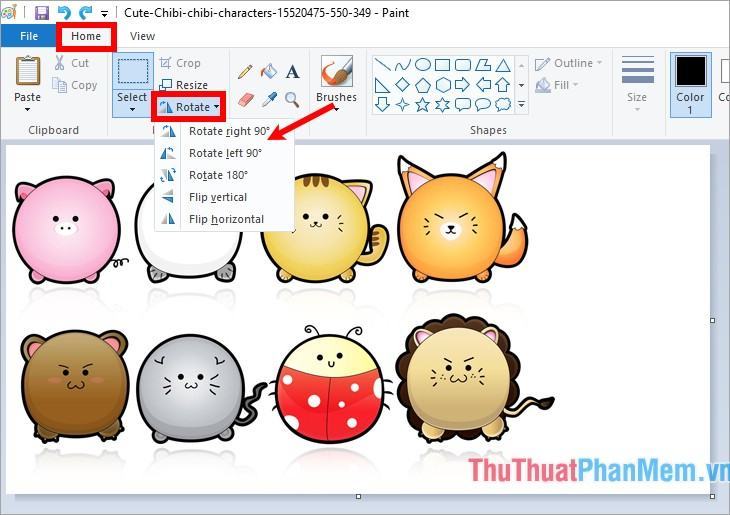
7. Rotate Photos in Paint
If you want to rotate the image, then you choose Home -> Rotate -> select the rotation type. Paint supports you many types of rotation:
- Rotate right 90o: rotate right 90 degrees.
- Rotate left 90o: rotate left 90 degrees.
- Rotate 180o: rotate 180 degrees.
- Flip vertical: flip vertically.
- Flip horizontal: flip horizontally.
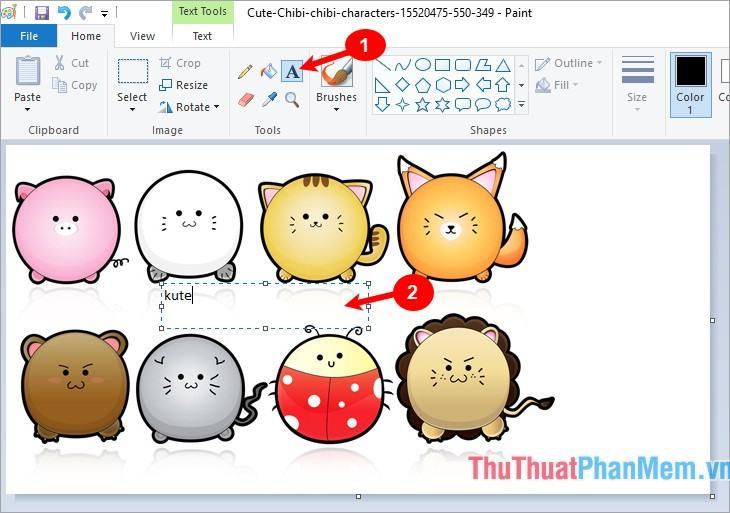
8. Add Text to Photos in Paint
Click on the letter A icon in the Home tab, then draw an area on the image and enter text in the selected area.
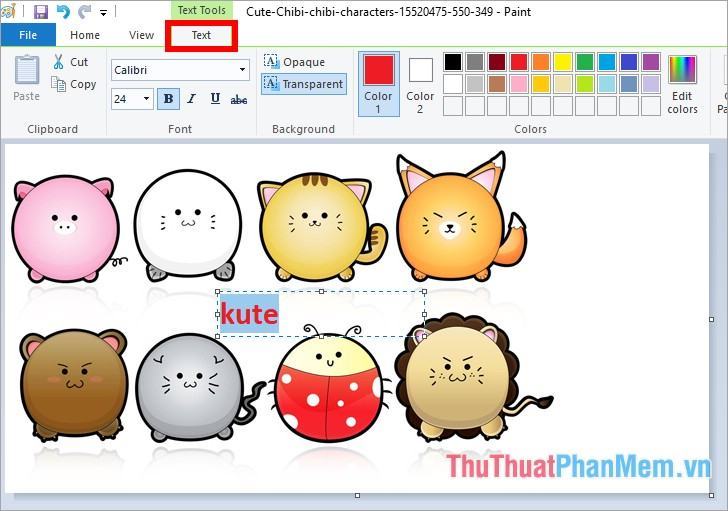
To edit the text, highlight the text you just entered and select the Text tab, here you can edit the background, font color, font size, font style…
To learn more about how to add text to photos in Paint, you can refer to the article https://thuthuatphanmem.vn/ghep-chu-vao-anh-bang-paint-co-san-tren-windows/
Use Paint to draw
1. Create a blank page to draw
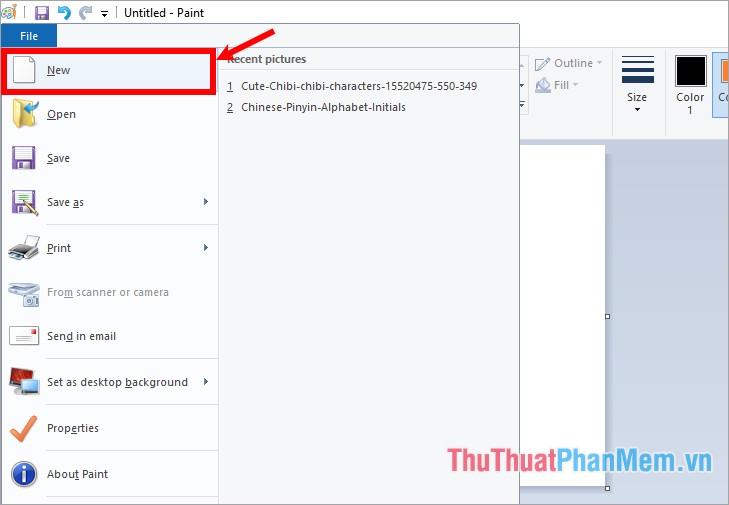
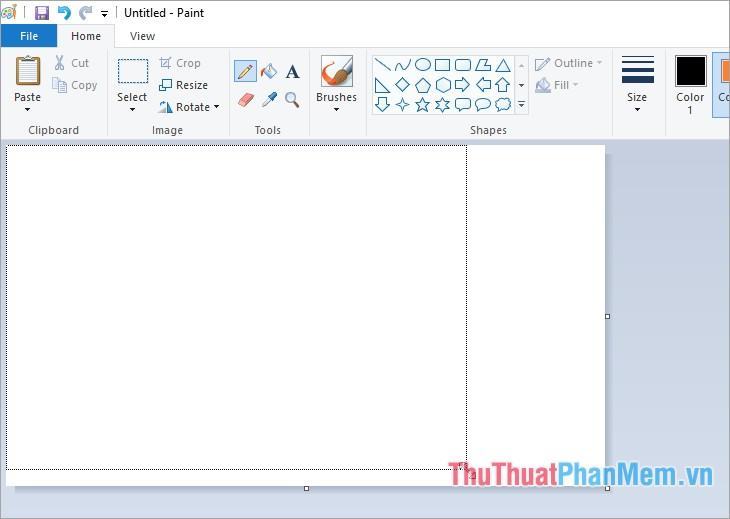
Choose File -> New (or Ctrl + N combination), you will have a white Paint page.
You can click on the grip button (bottom corner, middle right edge or middle bottom edge) and drag out, retract to get the appropriate drawing page size.
2. Color Palette Setup
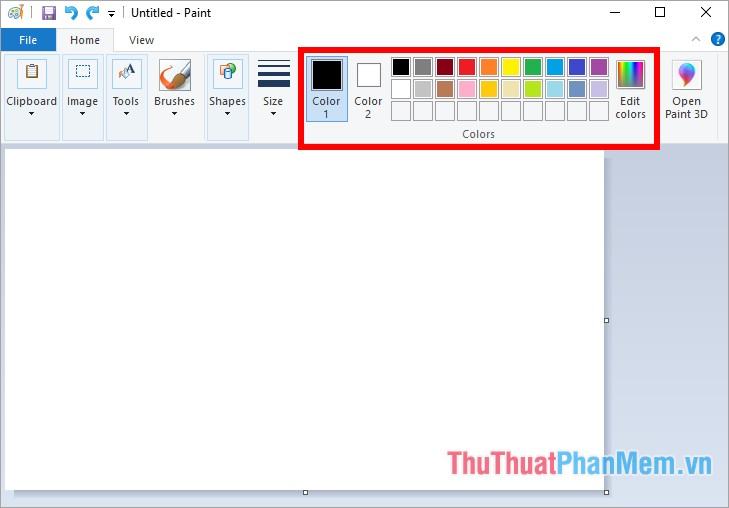
The squares in the Color section are the palette, there are two types of colors: Color 1: foreground color, Color 2: background color. The background color used when you draw the shapes. To choose the foreground color, choose Color 1 and choose any color in the palette, select the background color, choose Color 2 and choose any color in the palette.
3. Draw with the pen tool (Pencil)
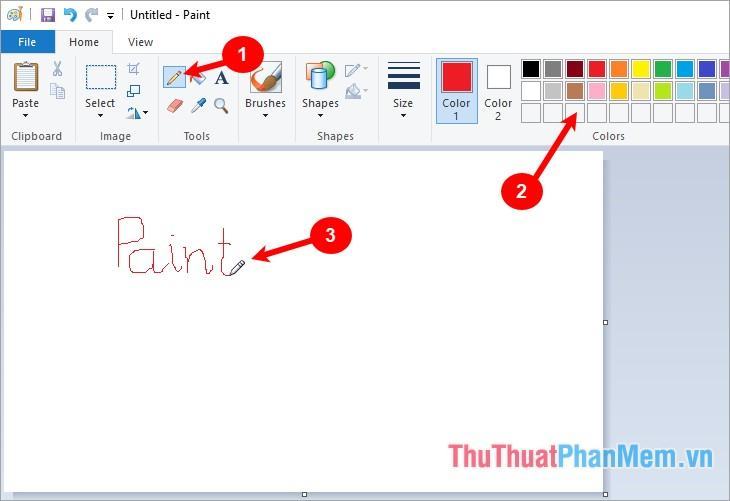
Click on the Pencil icon, then click on the paint color and hold the mouse on the white page and draw what you want.
4. Erase the error details with the Eraser tool
The eraser tool helps you to erase the error details about the Color 2 background color, so if the background is white, you need to set Color 2 to white. Next, select the Eraser icon, then hold down and hover over the area to be deleted.
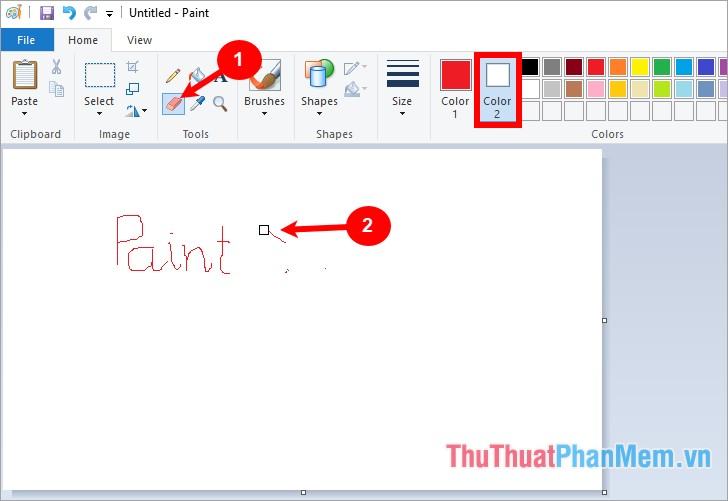
You can adjust the eraser size in the Size section.
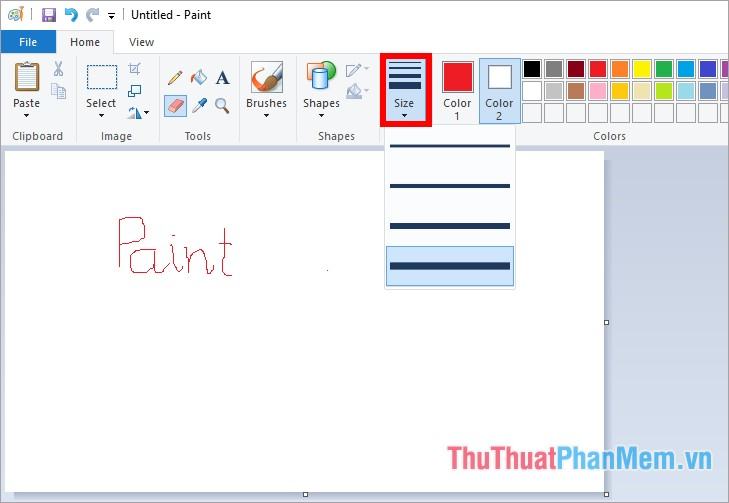
5. Fill background color, block color
Select the Fill with color icon, select the color to fill the background in the palette, then click on the background or shape to be filled.
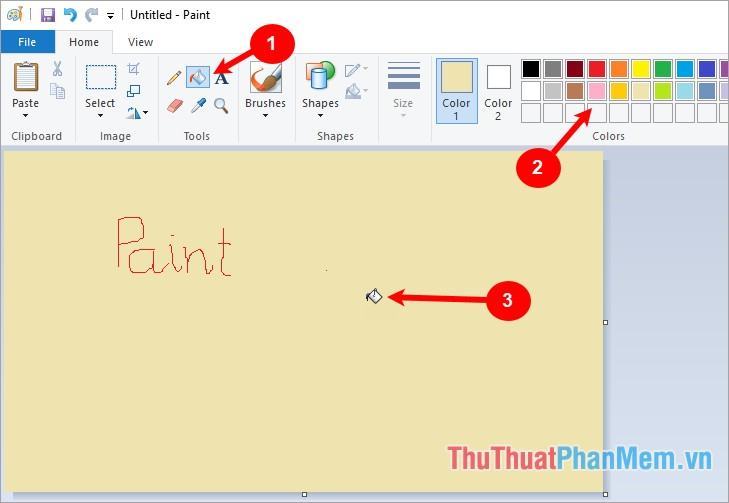
6. Write words on pictures
You perform the same writing as adding text to the image above.
7. Copy the color on the drawing
Use the Color picker tool to copy the color on the drawing to the Color 1 color box on the palette. You do the following:
Click on the pen icon (Color picker) then dot the pen on the color to be copied on the image, immediately on the Color 1 color box will appear the color you just selected.
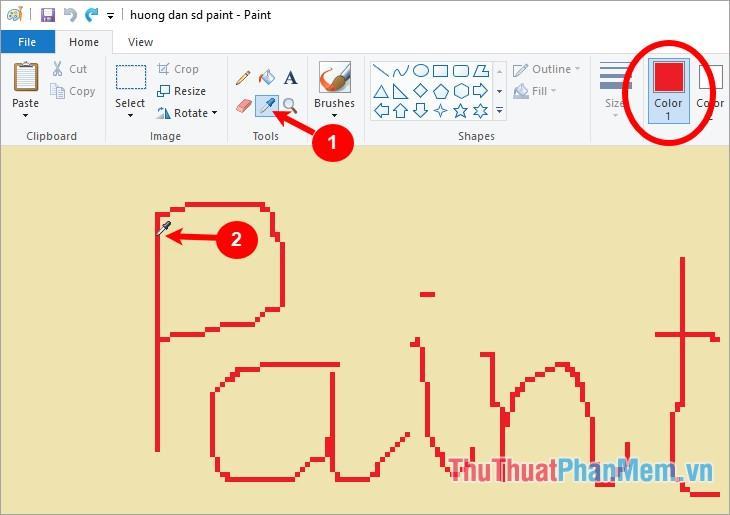
8. Draw lines, curves and shapes
Draw a line
Click the line icon in the Shapes section, select the size for the line in the Size section, and select a color in the Colors palette.
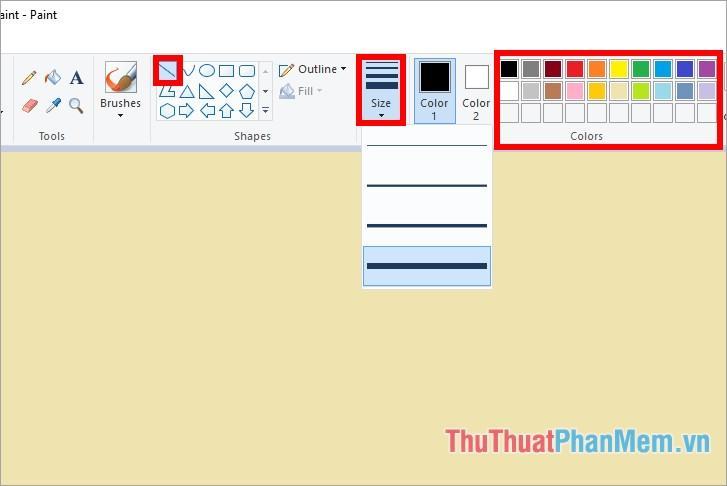
Then you click on the Paint page and draw in any position you want.
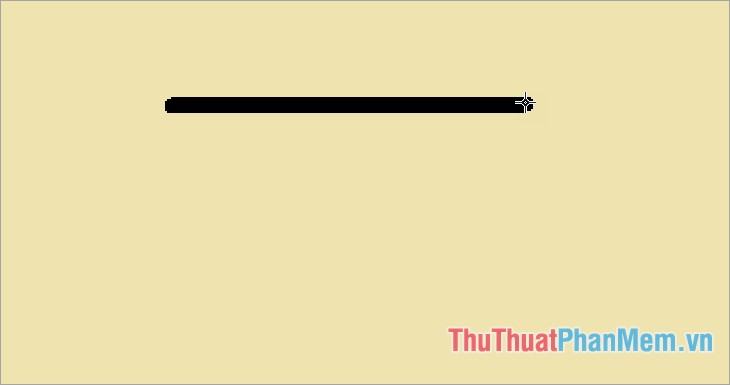
Draw curves
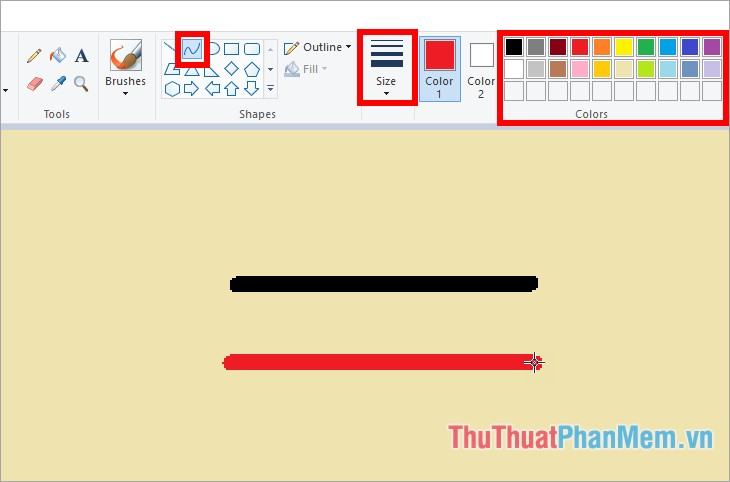
Click the curve icon in the Shapes section, choose the size for the curve in the Size section, select the color for the curve in the Colors palette. Then you click on the Paint page and draw the curve, when you first draw, the curve is just a straight line as shown below.
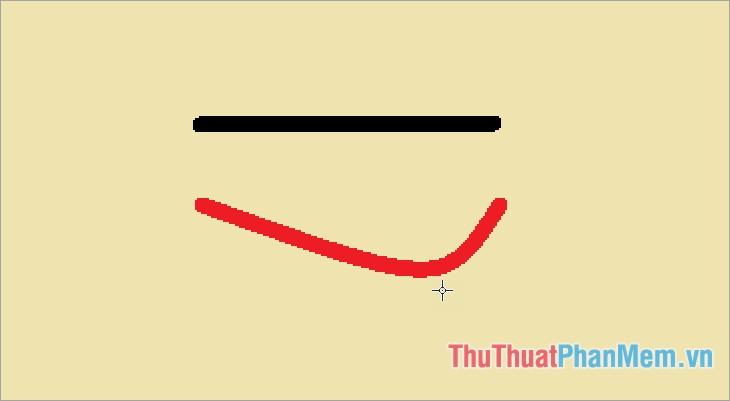
To adjust the curvature of the curve, click anywhere on the curve and drag the curve as you like.
Draw other shapes
You can choose the shape you want to draw in the Shapes section (ellipse, rectangle, triangle, diamond, 4-pointed star, 5-pointed star, left arrow, right arrow .. .). Next, you choose the border style for the block in the Outline section (Outline’s color is Color 1 in the palette), the block background color in the Fill section (the Fill color is Color 2 in the palette). If you want to change the color for any Color, then select that Color and select the color in the palette.
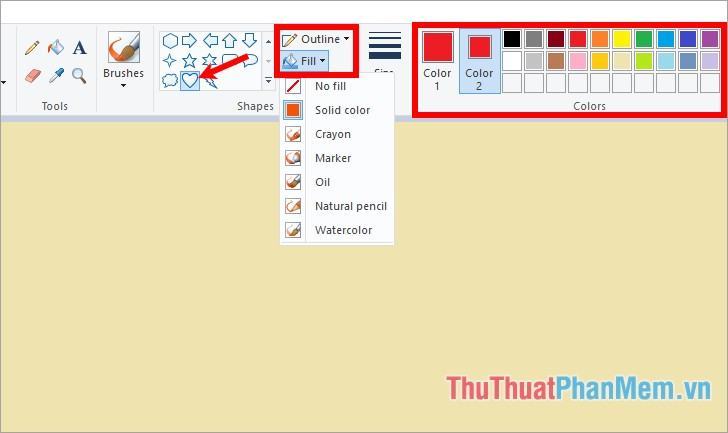
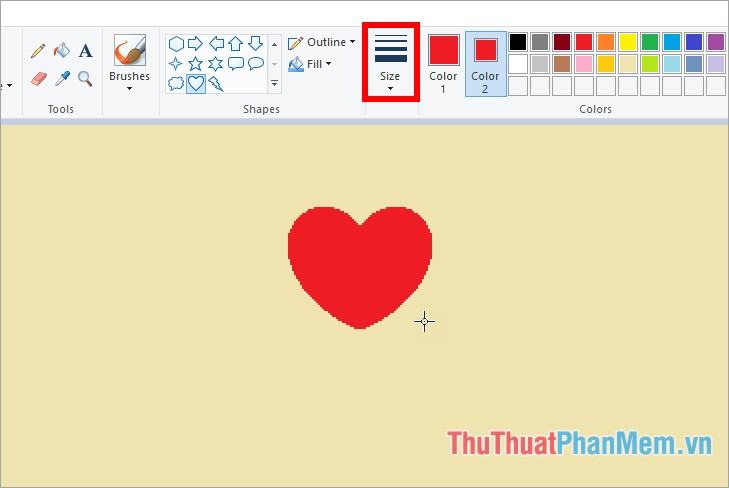
You can choose the size of the shape’s border in the Size section, then you draw to the position you want on the Paint page.
9. Using the Brushes . Tool
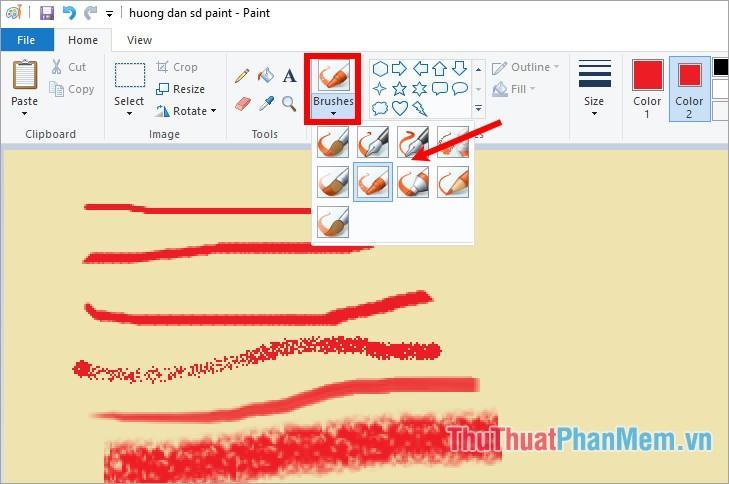
The Brushes tool is a drawing tool similar to Pencil, but this tool provides a lot of brush styles for you to choose from.
Save drawings, images after editing in Paint
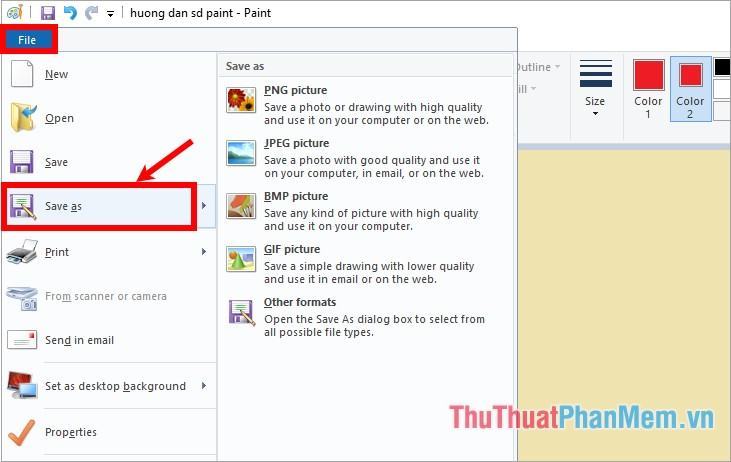
After editing and drawing the image, you choose File -> Save As to save the image into a new file.
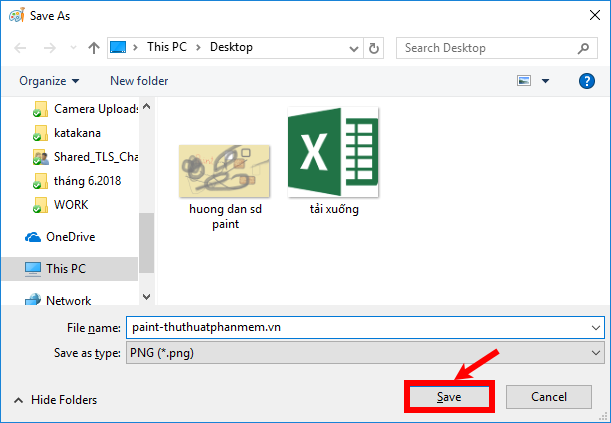
The Save As window appears, choose a location to save the file, enter the file name and click Save to save.
Summary of commonly used keyboard shortcuts in Paint
Ctrl + A selects the entire image.
Ctrl + C copies the selected area.
Ctrl + X cuts the selected area.
Ctrl + V pastes the selected area.
Ctrl + Z goes back to the previous action.
Ctrl + Y undoes the Ctrl + Z operation.
Ctrl + E view image details.
Ctrl + G shows/hides the grid.
Ctrl + P set to print the image.
Ctrl + R hide/show the ruler bar.
Ctrl + W opens the Resize and Skew dialog box.
Ctrl + N creates a new image.
Ctrl + O opens an existing image on the computer.
Ctrl + S saves the edited image.
Ctrl + Page Up minimizes.
Ctrl + Page Down zooms in.
Alt + F opens the Custom Menu.
Alt + H shows shortcut/Switch Home tab.
Alt + V switches to the View tab.
Alt + F closes the window.
Alt + Esc quickly minimize the MS Paint application.
Alt + Spacebar to quickly access the right mouse button on the Title Bar.
F1 opens help on Paint.
F11 view photos in full screen mode.
F12 saves the image as a new file.
Esc removes the selection.
Delete deletes the selection.
Hopefully with the instructions that the article shares, you will find the usefulness of Paint in Windows, you will be able to use Paint in necessary cases without using other image editing software. . Good luck!
Bạn thấy bài viết Hướng dẫn cách sử dụng Paint trong Windows có đáp ướng đươc vấn đề bạn tìm hiểu không?, nếu không hãy comment góp ý thêm về Hướng dẫn cách sử dụng Paint trong Windows bên dưới để vietabinhdinh.edu.vn có thể thay đổi & cải thiện nội dung tốt hơn cho các bạn nhé! Cám ơn bạn đã ghé thăm Website: vietabinhdinh.edu.vn
Nhớ để nguồn bài viết này: Hướng dẫn cách sử dụng Paint trong Windows của website vietabinhdinh.edu.vn
Chuyên mục: Kiến thức chung
Tóp 10 Hướng dẫn cách sử dụng Paint trong Windows
#Hướng #dẫn #cách #sử #dụng #Paint #trong #Windows
Video Hướng dẫn cách sử dụng Paint trong Windows
Hình Ảnh Hướng dẫn cách sử dụng Paint trong Windows
#Hướng #dẫn #cách #sử #dụng #Paint #trong #Windows
Tin tức Hướng dẫn cách sử dụng Paint trong Windows
#Hướng #dẫn #cách #sử #dụng #Paint #trong #Windows
Review Hướng dẫn cách sử dụng Paint trong Windows
#Hướng #dẫn #cách #sử #dụng #Paint #trong #Windows
Tham khảo Hướng dẫn cách sử dụng Paint trong Windows
#Hướng #dẫn #cách #sử #dụng #Paint #trong #Windows
Mới nhất Hướng dẫn cách sử dụng Paint trong Windows
#Hướng #dẫn #cách #sử #dụng #Paint #trong #Windows
Hướng dẫn Hướng dẫn cách sử dụng Paint trong Windows
#Hướng #dẫn #cách #sử #dụng #Paint #trong #Windows